Have you ever seen a landscape or cityscape that looked hyper-realistic -- a shot with amazing detail in the shadows, midtones, and highlights all at the same time? It is a HDR or High Dynamic Range Image. Often explained as "seeing more like the human eye," HDR imaging combines several shots of a given scene to overcome the exposure range limitations of traditional single-shot photography -- and the final results have much more detail from shadows to highlights, and everywhere in between.
The HDR process involves merging several exposures of a given scene into a 32-bit HDR source file, which is then "tone mapped" to produce an image in which adjustments of qualities of light and contrast are applied locally to the HDR source image (not globally), resulting in an image with amazing detail throughout the tonal range -- capturing highlights and shadows that would otherwise be lost in a traditional Low Dynamic Range (LDR) image.
You can either use software like Photomatix or Photoshop CS5 to create your HDR files.
The process of creating a HDR photo is to take three or more photos with different F stops (exposures) and then combining them together to get more detail from shadows.
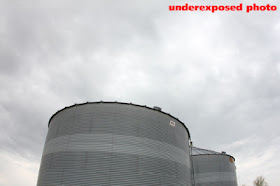
Here is an example of the same image taken underexposed, normal, and over exposed:

I then used Photoshop CS5 HDR Automate process to create this HDR basic image:
Photoshop has some presets that you can use when combining your photos to get the look that you want. I enjoy the Surrealistic Preset:
The Process of Creating an HDR Image:
Remember: Your focus, white balance, aperture, and ISO should all remain the same throughout the range.
1. Properly expose your first image- Doing this helps you set your white balance, aperture, and focus, while setting your middle image to the right exposure.
2. Put Everything in Manual: Disable the autofocus, the auto white balance, the auto exposure, and auto aperture. Your main settings can be switched to manual by setting your selector dial to ‘M’. You will need to change your aperture and white balance inside of menus inside your camera.
Tip: If you forget to put one of these in manual, you run the risk of having images that are not compatible for merging.
3. You need a tripod: Whether you purchase a cheap tripod or an expensive tripod depends solely on the environment you will be shooting within. The goal is to have a steady camera during your exposures, which may run as long as 30 seconds.
4. 3 is good, 5 is better: The minimum number of images for making a HDR image is 3, but the more images you have the more information you are recording. I prefer to capture 5 images, which allows me to capture images in the range of -2, -1, 0, +1, +2. Depending on your computers power and memory, you may be able to photograph more.
HDR Image:
After you capture your images, you can use a number of different software programs to merge them together. I merge my photos using Photoshop CS5, but there is a software called Photomatix Pro for $99 that give you more control over the merging.
To create the best HDR images you need to get out there and start practicing! Remember to pick an interesting subject, because even in HDR some images are still boring.
Here are some more examples of HDR Images:
DSLR Cameras:


No comments:
Post a Comment