

This has been adapted from the Guide to using the Canon VIXIA HFG10
shop now
About this tutorial:
This is a © Copyrighted Blog, pictures and information from Canon and Campbell Cameras and should not be used without their permission, by email Johanna@Campbelloutdoorchallenge.com, by phone: 618-382-7939 or by mail:
Campbell Cameras
Attn: Johanna Campbell
1327 Co. Rd. 800 N.
Carmi, IL 62821
Everything written in RED are KEY things that you should remember and pay extra attention too.
Everything written in BLUE are ways to use the camera for hunting situations, learning material, and/or recommendations by Johanna.
If you have any questions about this blog, camera, or anything else feel free to comment below or contact us using the information provided above.

Charging the Battery Pack:
The supplied battery charges while in the camera using the supplied battery pack. When you first get the camera, press the battery pack softly into the back of the camera until it clicks into place. Make sure that the camera is turned off (to charge), and plug the compact power adapter to the camcorder's DC IN Terminal(on the back of the camera).
*When you first charge your battery, charge it all the way. Wait until you fully exhaust the battery to re-charge it again.
Using the Viewfinder:
In some situations, it might be easier to use the viewfinder to view what you are recording. You can also use the viewfinder when you rotate the LCD screen 180 degrees, so that your subject can see what is being recorded. This could be helpful in hunting situations as a way to communicate to the hunter without words. The hunter can see what is being recorded and you can keep track while using the viewfinder. To use the Viewfinder, you pull it out.
LCD Backlight:

With the camcorder on, hold DISP. pressed down for more than 2 seconds.
• Repeat this action to switch the LCD backlight between off (normal) and on (bright)
Wireless Controller:
First, insert the supplied CR2025 lithium button battery in the wireless controller.
To use the controller:
1. Point the wireless controller at the camcorder's remote sensor when you press the buttons.

The supplied wireless controller is going to be a basic controller. The remote must be facing the sensor for the controls to work. Also, the wireless controller may not work properly when the remote is situated under strong light sources or direct sunlight.
For a wireless controller with more features and not these constrictions check out our Remote Controllers for more options.

You can mount the camcorder on a tripod or fluid head, but do not use tripods or mounting screws longer than 6.5 mm (.26 in.) as this may cause damage to the camcorder.
Using the Touch Screen:
The control buttons and menu items that appear on the touch screen change dynamically depending on the operation mode and the task you are performing. With the intuitive touch screen interface you have all the controls at your fingertips. You can also use the supplied stylus pen for more precise operation. *Remember in cold situations, you will most likely be wearing gloves, the stylus pen is what I recommend using in those situations. You may also want to look into gloves that have the options of removing the finger part of the gloves.
 Touch:
Press firmly on an element displayed on the touch screen. Used to start playing back a scene in an index screen, to select a setting from the menus, to select the subject whom the camcorder will recognize as the main subject of the scene (or animal), etc.
* I like using my pointer finger to touch and select items.
Drag:
While applying pressure, swipe your finger up and down or left and right across the screen. Used to scroll menus, to browse through index screen pages or to adjust slider controls like the volume.
* I like using my thumb for the actions that require scrolling.*Here is a link to Freehands Gloves that are designed to be used with touch screen electronics.
Operating Modes:
Recording: In recording mode, the camcorder's operating is determined by the position of the mode switch located on the top right of the camera.
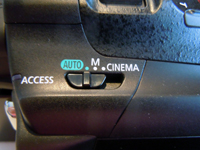 AUTO: Let the camcorder take care of all the settings while you concentrate on recording. This operating mode is suitable if you just prefer not to bother with detailed camcorder settings. *Remember, in AUTO, the camcorder is going to want to focus on that tree limb or other obstacle in front of your animal, instead of focusing on that buck or etc. unless you have touch and track activated. The BEST mode is always Manual
Only the following functions are available in AUTO mode:
• Zoom
• Quick Start
• Video Snapshot
• Advanced image stabilization modes to shoot video while walking or to stabilize the shot while zooming in on faraway subjects (telephoto)
• Face detection to get beautiful shots of people every time, tracking the subject even if the person moves.
• Touch & Track to track other moving subjects, keeping them in focus and using the best settings to record them.
• Story Creator to transform your movies into compelling video stories by following simple scrips for various scenarios.
• Decorations to add graphical elements using stamps, drawings, image mix and more.
M: M stands for Manual, where you have full access to menus, settings and advanced functions.
CINEMA: Give your recordings a cinematic look and use cinema-look filters to create unique movies.
 Playback: Press the camera/play button to switch the camcorder between camera(recording) mode and playback mode. You can press the button when the camera is turned off to turn it on directly in playback mode.
Using the Menus:
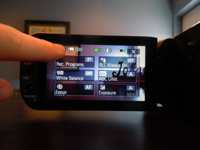
Many of the camcorder's functions can be adjusted from the FUNC. panel and the setup menus.
FUNC. Panel:
The FUNC. panel shows a convenient overview of frequently used shooting functions. Touch [FUNC] to access the FUNC. panel and then touch the function you want to set or adjust.
 You may need to drag your finger up and down the screen to find the control button of the desired function. In AUTO mode, access to functions is LIMITED.
Edit Panel:
Press and hold the camera/play button until you are in playback mode. Touch [Edit] to display a panel showing available operations (copying, deleting, etc.) and then touch the operation you want to perform.

Setup Menus:
The setup menu can not be accessed in AUTO mode and most menu settings will be reset to default values.
(in M or CINEMA mode only)
1. Touch [FUNC.]
2. Touch [MENU] to open the setup menus.
3. touch the tab of the desired menu.
4. Drag your finger up and down to bring the setting you want to change into the orange selection bar.
* Menu items that are not available appear grayed out. You can touch any menu item on the screen to bring it directly into the selection bar.
5. When the desired menu item is inside the selection bar, touch the orange frame on the right.
6. Touch the desired option and touch [X]. You can touch [X] anytime to close the menu.
Memory Cards:
As of October 2010, the movie recording function has been tested using SD/SDHC/SDXC memory cards made by Panasonic, Toshiba and SanDisk.
Memory Cards Compatible:
Memory Card Type: SD memory card, SDHC memory card, SDXC memory card
SD Speed Class: Class 2, 4, 6, 19
Capacity: 128 MB or larger to record movies.
About the Speed Class: Speed Class is a standard that indicates the minimum guaranteed data transfer speed of memory cards. When you buy a new memory card, look for the Speed Class on the package.
I recommend using memory cards rated SD Speed Class 6 or 10.
SDXC Memory Cards: You can use SDXC memory cards with this camcorder. When using memory cards with other devices such as digital recorders, computers and card readers, make sure that the external device is compatible with SDXC cards.
*When choosing a computer or a laptop make sure that if it has a Card Slot reader that it is SDXC compatible.
*After repeatedly recording, deleting and editing scenes (fragmented memory), it will take longer to write data on the memory and recording may stop. Save you recordings and initialize the camcorder.
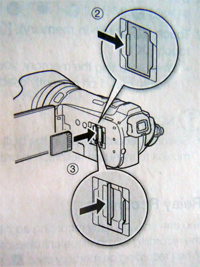
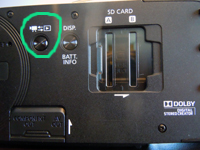
Inserting and Removing a Memory Card:
1. Turn off the camcorder.
2. Open the double memory card slot cover.
3. Insert the memory card straight, with the label facing the front of the camcorder, all the way into one of the memory card slots until it clicks. You can insert one memory card into each slot.
4. Close the double memory card slot cover. *Do not force the cover closed if the memory card is not correctly inserted.
To remove the memory card, push the memory card once to release it. When the memory card springs out, pull it all the way out.
*Remember to always have the camcorder OFF when inserting and removing SD cards.
Selecting the Memory for the Recordings:
You can select to record your movies and photos in the built-in memory or on a memory card. The default memory for recording both is the built-in memory.

1. Select [FUNC.], [MENU], the film strip category, [Rec Media for Movies] or [Rec Media for Photos] (depending on the function of the camcorder.
2. Touch the symbol to bring up your options. You will see 3 icons. The first, is the built-in-memory icon, the second is an A for the 1st card slot, and a [B] for the 2nd card slot.
Depending on what you select your primary recording location to be, more options appear.
To keep recording to the internal memory you select the first icon for the internal memory and then touch [X]
Relay Recording:
You can activate relay recording so if the memory you are using becomes full while recording movies the recording will continue uninterrupted on a memory card. When recording on memory card A, you can use memory card B for relay recording. When recording in the built-in memory, you can choose to use only memory card A for relay recording, or use both memory cards. *Memory Cards can not contain video recordings if you are going to do the relay recording.
1. Insert a memory card that contains no video recordings into the card slot of the memory card you want to use for relay recording.
2. To open the Relay Recording Screen you touch [FUNC.] > [MENU] > Film strip icon > [Rec Media for Movies] > The Internal Memory Icon (to go from internal to card slot A, or both) or [A] (to go from A to B slots).
3. Touch the desired option and then touch [X]

Any of the following actions will deactivate the relay recording function:
• Turning off the Camcorder.
• Opening the double memory card slot cover.
• Changing the position of the mode switch.
• Changing the camcorder's operating mode.
• Changing the memory used for recording movies.
I recommend using relay recording when you are out filming your hunt. A) Until you run out of memory on the internal, A and B memory cards you will not have to fidget with turning your camera off, and switching out memory cards. This cuts down on time and sound, both critical to hunting situations. Remember to reset the relay recording if you do any of the things mentioned above!Double Slot Recording:
Double slot recording allows you to record the same scene simultaneously to both memory cards. This is a convenient way to make a backup copy of your recording while you record.
1. Insert Memory Cards into memory card slot A and memory card slot B.
2. Open the [Rec Media for Movies] screen (directions above)
3. Activate double slot recording by selecting the [A] > [Double Slot Rec] > [ON]
4. Touch [X].
The double D icon will appear on the screen that allows you to see that the Double Slot Recording option is selected.
If you have the means of buying more SD cards then just two, I would recommend you use the Double Slot Recording method while out in the field to give you instant backup of everything that you recorded. I, personally, like having the same size SD cards in both the A and B slots, because that way I am not loosing recording time on one card. A good thing about the Double Slot Recording is that if an error occurs on one of the cards while recording, the other SD card will keep on recording. Of course, you can not use both the Relay Recording and the Double Slot recording at the same time and you will have to make a personal decision on that one based on how long you will be filming, the conditions, and SD card availability.Initializing the Memory:
Initialize memory cards when you use them with this camcorder for the first time. You can also initialize a memory card or the built-in memory to permanently delete all the recordings it contains. At the time of purchase, the built-in memory comes pre-intialized and contains music files for use as background music and images for use with the image mix function (image mix frames).

2. Open the initialization screen for the desired memory. Touch [FUNC.] > [MENU] > Wrench icon > scroll down to the [Initialize] option > press [Initialize]
3. Touch [Yes].
•If you selected [Complete Initialization] option, you can touch [Cancel] to cancel the initialization while it is in progress. All recordings will be erased and the memory can be used without any problem.
4. Touch [OK] and then touch [x]
• Initializing the memory will PERMANENTLY erase all recordings. Lost original recordings cannot be recovered. Make sure you save important recordings in advance using an external device.
• Initializing a memory card will PERMANENTLY erase any music files and images you may have transferred to the card. (The music files and image mix frames that come pre-installed in the built-in-memory will be restored after it is initialized).
To transfer music files from the supplied Camcorder Supplement Disc to the memory card:
- Windows users: Use the supplied PIXELA's software. For details, refer to the Software Guide (PDF file) of the supplied PIXELA's software.
- MAC OS users: Use Finder to transfer music files from the [MUSIC] folder on the supplied Camcorder Supplement Disc to the memory card.
Quick Start Function:
When you close the LCD panel with the camcorder on, the camcorder enters the standby mode. In standby mode the camcorder consumes only 1/3 the power used when recording, saving energy when you are using a battery pack. Additionally, when you open the LCD panel or pull out the viewfinder, the camcorder is ready to start recording in approximately 1 second, allowing you to record the subject right away.
* The camcorder will not enter standby mode with the ACESS indicator is on or flashing, while a menu is being displayed or while using the viewfinder. The camcorder may also not enter standby mode when the battery charge is too love. Check that the ON/OFF (CHG) indicator changes to orange.
Recording in M (manual) Mode:
When the mode switch (top right of camera) is set to M (manual Mode), you can enjoy full access to the menus and manually adjust exposure, focus, white balance and many more of the camcorder's settings to your preference. Even in M mode, though, the camcorder can help you with the settings. For example, by using Special Scene recording programs.
Selecting the Video Quality (Recording Mode):
The Camera offers 5 recording modes. Changing the recording mode will change the recording time available on the memory. Select MXP or FXP mode for better movie quality; select LP mode for longer recording time. The following table gives approximate recording times.
1. Open the [Recording Mode] screen by touching [FUNC.] > [MENU] > Film strip icon > scroll to [Recording Mode]
2. Touch the desired recording mode and then touch [X]


Notes:
• Movies recorded in MXP mode cannot be saved on AVCHD discs. Use an external Blu-ray Disc recorder to copy MXP movies onto Blu-ray Discs or use the supplied software VideoBrowser to create AVCHD dics, however, MXP scenes will be converted to an image quality similar to that of FXP scenes.
• The camcorder uses a variable bit rate (VBR) to encode video so the actual recording times will vary depending on the content in the scenes.
• The camcorder retains the last setting used even if you set the camcorder to AUTO mode.
Selecting the Frame Rate:
You can change the frame rate (the number of frames recorded per second) to change the look of your movies.
1. Open the [Frame Rate] screen by touching [FUNC.] > [MENU] > Film Strip Icon > scroll to [Frame Rate]
2. Touch the desired frame rate and then touch [X].
Frame Rate options:
60i (standard) : 60 fields per second, interlaced. Standard frame rate of NTSC analog TV signals.
PF30 : Shooting at 30 frames per second, progressive. Use this frame rate to easily edit your recordings, for example, to post them on the web. *recorded as 60i
PF24 : Shooting at 24 frames per second, progressive. Using this frame rate will give your recordings a cinematic look.. Recording in [CINEMA] mode will further enhance the effect. *recorded as 60i
24P: 24 frames per second, progressive. Using this frame rate will achieve the same cinematic look as PF24, the difference being that the video is recorded as true 24p. These movies can not be converted to standard definition using the camcorder.
Focus Adjustment:
You can adjust the focus manually and use the peaking function to assist you or you can let the camcorder focus for you by using autofocus. With autofocus, you can set the autofocus speed. The camcorder also features two more focusing functions, face detection and Touch & Track.
I do not recommend using Auto focus while out in the field hunting. The camera will want to Auto Focus on whatever is in front of the camcorder, instead of focusing on the animal. For in studio use, the auto focus is okay, but the Manual Focus is always your best bet.
Manual Focus:
Using the focus ring manually. You can also use peaking to help you focus more accurately.
1. Open the Focus Controls by [FUNC.]> scroll to [Focus].
• To switch to autofocus without opening the focus controls, press the [AF/MF] button on the side of the LCD Screen. Touch AF will not be available.
2. Touch [MF]
3. Touch a subject (person, animal, object) that appears inside the frame that you want to focus on. For arrows symbol will pop up on screen and will flash and the focusing distance will be adjusted automatically. You have the option to further adjust the focus manually as necessary.

 4. Turn the focus ring to adjust the focus.
• The center of the screen will be magnified to help you focus more easily. You can also turn off the function by going to the Wrench icon > Video Camera icon > [Focus Assistance] setting.
• The focusing distance displayed will change as you adjust the focus. You can change the units used for distance display by changing the Wrench Icon > [Distance Units] setting.
Focus Preset:

1. Open the Focus Controls [FUNC.] > [Focus]
2. Touch [MF]
3. Turn the focus ring to the desired focus position.
4. Touch [SET] to set the preset focus position.
5. After adjusting the focus, touch [ON] to return to the preset focus position.
• Touch [SET] again to cancel the current preset focus position.
• [ON] will be grayed out while adjusting the focus or zoom.
Once you turn the camcorder off, the preset focus positioned will be canceled. Also, when the camera is in AUTO mode, the focus preset function cannot be used.
Peaking:

1. [FUNC.] > [Focus]
2. Touch the wrench symbol
3. To turn on the black & white setting : Touch [ON] of [OFF]
4. For the peeking color: Touch [Red], [Blue], or [Yellow]
5. Touch the return symbol

• Peaking is activated and the edges are highlighted. You can turn the focus ring on this screen or touch [X] to hide the focus controls.
• The peaking effect and black & white picture will not appear in your recordings.
Face Detection:
The camcorder automatically detects people's faces and uses this information to select the optimal focus and exposure settings. *Face Detection is always activated in AUTO mode.
By default, the face detection is activated. If the function was turned off, perform the following steps to turn it on.
1. Open the [Face Detection & Tracking] screen by touching [FUNC.] > [MENU] > Video camera symbol > [Face Detection & Tracking].
2. Touch [ON] and then touch [X]


Touch a different face on the screen to optimize the camcorder's settings for that person using the touch and track function.
Touch And Track:
When recording a group of animals, or just one, the camcorder will automatically detect one animal as the main subject. You can use Touch & Track to tell the camcorder to track and optimize settings for a different subject. You can also use Touch & Track to always keep in focus other moving subjects and people.
1. Make Sure Face Detection and Autofocus are activated.
2. Point the camcorder at a moving subject and touch the subject on the touch screen.
• A white double frame will appear around the subject and track it as it moves.
• Touch [Cancel ] to remove the frame and cancel the tracking.
*Touching somewhere with a color or pattern unique to the subject will make it easier to track. However, if there is another subject in the vicinity that shares similar characteristics to the selected subject, the camcorder may start tracking the incorrect subject. Touch the screen again to select the desired subject.
Zooming:
There are three ways you can zoom in and out: using the zoom lever on the camcorder, using the zoom buttons on the wireless controller(must be pointing directing at the camcorder) or using the zoom controls on the touch screen.
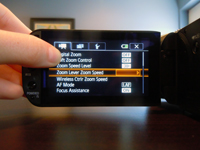
Setting the Zoom Speed:
For the zoom lever, first set the overall zoom speed to one of three levels. Next select whether the zoom lever operates at a variable or constant speed.
1. Open the zoom speed lever screen. [FUNC.] > [MENU] > Video Camcorder icon > [Zoom Speed Level]
2. Touch Fast, Normal, or Slow to select the zoom speed then select the return arrow.
3. Touch [Zoom Lever Zoom Speed]
4. Touch [VAR] for variable speed or [CONST] for constant speed.
• If you selected Constant speed touch the up or down arrows or drag your finger along the bar to select a constant speed.
5. Touch [X]
Using the Touch Screen's Zoom Controls:
1. Display the zoom controls on the touch screen by touching [FUNC.] > [ZOOM]. Then the zoom controls will appear on the left side of the screen.
2. Touch the zoom controls to operate the zoom.
3. Touch [X] to hide the zoom controls.
Automatic Gain Control (AGC) Limit:
When recording in hunting situations in dark surroundings, the camcorder will automatically increase the gain to try to get a brighter picture. However, using higher fain values will result in more noticeable video noise (grainy image). You can select the AGC limit to curb the amount of noise by setting the maximum gain value to be used. The smaller the AGC limit, the picture will be darker but will have less the noise.
If you are looking to produce a TV Show or DVDs, I would recommend you not go over 0db. However, if you are on that hunt of a lifetime and you know that within the next couple of min. you will be taking that shot of a lifetime, then you can raise the gain up a little, but you will be sacrificing the video quality.1. Open the AGC limit adjustment screen by touching [FUNC.] > [AGC Limit] > [M manual]
• You would touch [A Automatic] to remove the AGC.
2. Touch [<] or [>] to set the AGC limit. or drag your finger along the dial.
3. Touch [X] and the selected AGC limit will appear on the screen.

Automatic Exposure Recording Programs:
With the automatic exposure (AE) recording programs, the camcorder will adjust the shutter speed and/or aperture value to obtain the optimal exposure. When using the AE recording programs, you can change functions like the white balance and image effects.
1. Open the screen of the desired recording program by touching [FUNC.] > [Rec. Programs] > desired program.
2. Touch [<] or [>] to set the desired shutter speed then touch [X]
options:
[P Programmed AE] - The camcorder automatically adjusts the aperture and shutter speed to the optimal exposure for the subject.
[TV Shutter-Pri. AE] - Set the shutter speed value. The camcorder automatically sets the appropriate values.
[AV Aperture-Pri. AE] - Set the aperture value. The camcorder sets the appropriate shutter speed.
To understand the terms Shutter Speed and Aperture and how to manipulate it, check out our Manipulating Depth of Field Blog HEREAvailable shutter speed settings:
1/8
1/15
1/30
1/60
1/100
1/250
1/500
1/1000
1/2000
Exposure Adjustment:
At times, when filming out doors, backlit subjects may appear too dark (underexposed) or subjects under very strong lights may appear too bright or glaring(overexposed). In such cases, adjusting the exposure will correct this. This camcorder features a dedicated recording program , [M Manual Exposure], for adjusting the exposure manually.
Using the Manual Exposure Recording Program:
Using the [M Manual Exposure] recording program, you can adjust the aperture, shutter speed and gain to achieve the desired exposure.
Manipulating these three things (Aperture, Shutter Speed, and Gain) will effect your camera and the way that it picks up the light. Playing with theses features will allow you to become more aware of the lighting conditions and where to set you camera at to get the best picture.1. Activate the [M Manual Exposure] recording program by touching [FUNC.] > [Rec Programs] > [M manual Exposure]

2. Touch the control setting you wish to adjust.
3. Touch [<] or [>] to set the desired value.

 |
*Notice in the images how the picture is changed by increasing/decreasing each setting.
Using the Zebra Pattern:
You can use the zebra pattern as a nice rug, just kidding. You can use it to identify areas that might be overexposed, so you can correct the exposure appropriately. The camcorder offers two levels of zebra pattern: With 100% only areas that will lose detain in the highlighted areas will be identified, while 70% will identify also areas that are dangerously close to losing detail. While in the [M Manual Exposure] settings, touch the wrench symbol to select your zebra level (70% or 100%)
 3. Touch below the wrench symbol where it is a zebra icon with a 70% or 100% and then touch [X]
Your zebra pattern will appear on the overexposed areas of the picture. Touch again to turn off the zebra pattern.
You can use the Zebra Pattern as a way to determine what is being overexposed. You can then go in and change the F-stops and Shutter Speed to help expose those areas in the zebra pattern, if that is your desired look.White Balance:
The white balance function helps you to accurately reproduce colors under different lighting conditions.
1. Open the White Balance screen by touching [FUNC.] > [WB White Balance]
2. Touch the desired option and then touch [X]
• When you select [K Color Temperature], [Set 1] or [Set 2], set the color temperature or a custom white balance with the appropriate procedure below before touching [X]
• The icon of the selected option will appear on the screen.

To set the color temperature [K Color Temperature]:
Touch the [<] or [>] to set the desired value or drag your finger along the dial.
 |
| Showing the Change in color with K |
To Set a custom White Balance [Set 1] or [Set 2]:
Point the camcorder at a white object, so it fills the whole screen, and touch [Set WB]. The camcorder will retain the custom white balance even if you turn it off.

Other options:
*Pictures are used to demonstrate the color difference under each setting.


[Tungsten]: To record under tungsten and tungsten-type (3-wavelength) Fluorescent lighting.


Remember to reset your white balance when you change locations. Also, if your out in the field and you white balanced in the morning, you will need to change the white balance throughout the day as the sun and lighting conditions change. When selecting custom white balance, your results will always be better than Automatic. You can buy white cards that you can put in your pocket and pull out throughout the day.
Audio Recording Level:
You can adjust the audio recording level of the built-in or an external microphone. You can display the audio level indicator while recording.
1. Touch [FUNC.] > [Mic. Level] > [M Manual]
• the audio level indicator and current audio recording level will appear on the screen. If you are using an external microphone as well you can see that audio level indicator by going to [FUNC.] > [MENU] > Video camcorder symbol > [Audio Mix] > set it to [on].
• Touch the [A Automatic] to return the camcorder to automatic audio recording levels.
Audio is VERY IMPORTANT when it comes to recording. Without being able to monitor the audio, you will not know what is being recorded until you playback the footage and by that time the moment is gone!To adjust the audio you touch and hold [<] or [>] as necessary
As a guideline, adjust the audio recording level so that the audio level meter will go to the right of the -12 dB mark only occasionally. Headphones are a great way to listen to the sound that is being recorded, as well as monitor the levels on the LCD Screen. To use headphones, you go to [FUNC.] > [MENU] > Wrench symbol > [AV/Headphones] > touch headphones and then the return icon. Then you can connect your headphones into the AV Out terminal.

To display the audio level indicator:
Usually, the audio level indicator will be displayed only after activating the manual adjustment of the audio recording level. You can choose to display it also when the audio level is adjusted automatically.
1. Go to [FUNC.] > [Mic. Level] > [A Automatic]
2. Touch [Audio Level Indicator] and then touch [X]
Custom Button and Dial:

1. Open [FUNC.] > [Menu] > Wrench symbol > [Custom Key/Dial]
2. Touch desired option and then touch [X]

Options:
Tv/Av: When you set the recording program to [Tv Shutter-Pri. AE] or [Av Aperture-Pri. AE] priority, you can adjust the shutter speed or aperture value with the CUSTOM Dial.
Manual Exposure: When you set the recording program to [M Manual Exposure], press CUSTOM to toggle between the aperture value, shutter speed and gain. Next, use the CUSTOM dial to adjust the setting.
AGC Limit: When you set the [AGC Limit] in the FUNC. Panel to [M Manual], you can adjust the AGC limit with the Custom Dial. Press CUSTOM first if the AGC limit does not appear on the screen.
Exposure: Adjust the exposure. Press CUSTOM to display the exposure value and then use the CUSTOM dial to adjust the exposure value. (default)
OFF: Use this setting if you do not intend to use CUSTOM or CUSTOM dial.

The camcorder conveniently features 2 buttons to which you can assign various functions. By assigning often used functions, you can quickly access them in the field with a single press of a button.
Changing the Assigned function:
1. Open [FUNC.] > [MENU] > Wrench Symbol > [Assign Button 1] or [Assign Button 2]
2. Select the desired option and then touch [X]

Options:
[BLC Always On] : Turns backlight correction on/off
[ Face Only AF] : Turns face only autofocus on/off
[ Story Creator] : Activates Story Creator mode
[ Video Snapshot]: Turns video snapshot on/off
[ WB Priority] : Turns white balance priority on/off
[ AF/MC] : Switches between autofocus and manual focus. This option is available only for assignable button 1.
[Powered IS] : Turns Powered IS on/off. This option is available only for assignable button 2.
[Off]: Does not assign a function to the assignable button.
*** On the Canon VIXIA HFG20 the assignable button number 2 is pre selected for Pre Record. This Pre Record allows you to capture 3 seconds of video before the record button is pushed ***
If you have any questions on this camera or the features mentioned, feel free to comment below!


I was wondering if there was any type of shortcut to delete the last clip recorded. I film skateboarding and if there are multiple subjects I don't have time to switch screens/mode,then play the video, pause it, then delete.By the time I finally get it back to be able to shoot, I've missed 3 or more runs! I also like to review the clip to make sure it's the correct clip to delete. Leaving them and reviewing them all later is very tedious and time consuming, especially when the majority of the clips are from 5-20 seconds long. My Handycam has a 'back' arrow that pulls up the last clip taken. I would like to think the G20 would have a similar feature, at the very minimum?! ANY help or links to tips and tricks would be greatly appreciated Thank you in advance!
ReplyDelete-Jeff
Jeff-
DeleteWith the G20, you can go into the playback mode and click on EDIT and then DELETE and then it gives you the option to delete the last clip taken, to select various clips you want to delete or to delete all. You could choose the SELECT option and then it brings all your clips up, from there you can select the ones that you want to delete. You do not have to go through and watch them all to delete them! Hope this answers your questions
can you use a 64 sdxc memory card on a canon VIXIA HF G10 ?
ReplyDeleteJoel
Joel,
DeleteYes you can use a 64gb SDHC Card, I would recommend at least a class 10 card.
http://www.campbellcameras.com/shopping/Products/Campbell-Cameras-64GB-Class-10-SDHC-Card__810MUSCAM64.aspx
When I go to move the videos I captured in the internal memory of the camera to memory card A, the copy and move selections aren't working, they are dimmer than the delete button and can not be used.
ReplyDeleteRyan,
DeleteThis is probably due to the size of the card that is in the slot. It needs to be at least a Class 10 card and depending on how much footage you have in it the memory size might need to be larger!!
Can i use a canon ma-300 xlr with this camera? it seems like a good way to get a mic mount and 2 XLR inputs in one device.
ReplyDeleteYou can use the Canon MA300 but you can not have any control over the audio that you put through it. If you want to have control over your audio, I would go with a Beachtek adapter!
ReplyDelete