

©Campbell Cameras
Detailed information(text) and camera images not to be used without CampbellCameras Written Permission
YOU CAN CLICK ON ANY PHOTO TO ENLARGE IT TO SEE THE DETAILS
Things to Remember:
- If a menu item is "grayed" out, it means that that option is not available under the current recording condition.
- DO NOT EXPOSE your camcorder's lens or LCD viewfinder to the sun for extended amount of time as it will damage them. Be sure and use the Lens Hood and an LCD Hood if filming in sunny conditions.
- Temperature - The camcorder is not recommended in weather conditions below 32º as it can affect your recordings. To solve this you can get a Polar Mitten Cover that allows you to place heat warmers in it to keep your video camera warm. Batteries will be effected when the temperature reaches below 32º, and the battery life will go down. It is important to a) keep your batteries warm and b) have extra batteries when filming in colder situations.
- I recommend formatting your SD cards when they are new, and when reusing the cards. ALL DATA RECORDED ON THE MEMORY CARD WILL BE ERASED BY FORMATTING, AND CAN NOT BE RECOVERED. Save important data on the memory card on other media such as a computer, before formatting the memory card.
Sony's HDR-AX2000 makes for an impressive prosumer-level AVCHD camcorder for the outdoor videographer. The camera's ability to capture HD and SD video in AVCHD and MPEG-2 formats--and save it to solid state media--is only one of the traits distinguishing it from its tape-based fore bearer. Full 1920 x 1080 HD video--which can be recorded at 60i, 30p and 24p--is another. The footage is saved to either Memory Stick PRO Duo or SD/SDHC cards, then easily downloaded to computer for editing via USB 2.0 interface.
Inserting Memory Cards:
The SD Card slots are located in the back of the camera next to the battery. To insert SD cards into the camera you
1) Open the cover
2) Take your memory card with the notched corner facing down, and insert into the memory card slot until it clicks.
3) Repeat with memory card slot B.
FORMATTING MEMORY CARDS
1) Press the MODE button

SELECTING THE MEMORY CARD SLOT TO BE USED FOR RECORDING
 TO EJECT THE MEMORY CARD
Lightly push the memory card once. When the light by the card is flashing red, your camcorder is reading/writing data. DO NOT shake or knock your camcorder, turn the power off, eject the memory card, or remove the battery pack. Otherwise, image data may be damaged.
Relay Recording
Insert memory cards each in both slots A and B, so the camcorder switches memory card A and B, so the camcorder switches memory card A (or B) just before space on the other one runs out, and continues recording on the next memory card automatically.
*Do not eject the memory card that is currently being used for recording. Replace only the memory card whose slot lamp is off.
• Even if you press the memory card slot button, A or B, while recording, you cannot switch the slot currently being used.
• If you start recording on a memory card with the remaining recording time less than 1 minute, the camcorder may not be able to relay-record.
Selecting the Recording Format
You can select the recording format (bit-rate, image quality, image size, frame rate, scanning system).
Available formats:
FORMATTING MEMORY CARDS
1) Press the MODE button

2) Touch [MANAGE MEDIA] –> [MEDIA FORMAT]
3) Touch the memory card to be formatted
4) Touch [YES] –> [YES] –> OK
*Formatting deletes all data from the memory card to recover recordable free space.
* YOU CAN NOT RECOVER LOST FILES AFTER YOU FORMAT THEM!!!
*Connect your camcorder to the wall outlet using the supplied AC adaptor to prevent your camcorder from running out of power during the operation
SELECTING THE MEMORY CARD SLOT TO BE USED FOR RECORDING
- Press the A or B button of the memory card slot where the memory card you want to record on is inserted. The lamp of the selected slot lights up in green. You can only select a slot that already has a memory card inserted. While movies are being recorded on the memory card, you cannot switch the slot even if you press the memory card slot A/B button. If you only have one memory card inserted, the slot that has the memory card is selected automatically.
Lightly push the memory card once. When the light by the card is flashing red, your camcorder is reading/writing data. DO NOT shake or knock your camcorder, turn the power off, eject the memory card, or remove the battery pack. Otherwise, image data may be damaged.
Relay Recording
Insert memory cards each in both slots A and B, so the camcorder switches memory card A and B, so the camcorder switches memory card A (or B) just before space on the other one runs out, and continues recording on the next memory card automatically.
*Do not eject the memory card that is currently being used for recording. Replace only the memory card whose slot lamp is off.
• Even if you press the memory card slot button, A or B, while recording, you cannot switch the slot currently being used.
• If you start recording on a memory card with the remaining recording time less than 1 minute, the camcorder may not be able to relay-record.
Selecting the Recording Format
You can select the recording format (bit-rate, image quality, image size, frame rate, scanning system).
Available formats:
Setting Value
| Description |
| HD 1080/60i FX | • Bit-rate FX: max. 24 Mbps FH: approx. 17 Mbps (average) HQ: approx. 9 Mbps (average) LP: approx. 5 Mbps (average) • Image Quality HD: High definition image quality SD: Standard definition image quality • Image size FX: 1920x1080 FH: 1920x108 HQ: HD recording 1440x1080 SD recording: 720x480 LP: 1440x1080 • Frame Rate either 24, 30, or 60 • Scanning system i: interlace p: progressive pSCAN: records images of progressive scanning system as interlace signal (60i) |
| HD 1080/60i FH | |
| HD 1080/60i HQ | |
| HD 1080/60i LP | |
| HD 1080/30p FX | |
| HD 1080/30p FH | |
| HD 1080/24p FX | |
| HD 1080/24p FH | |
| SD 480/60i HQ | |
| SD 480/30p SCAN HQ | |
| SD 480/24p SCAN HQ | |
TO CHANGE THE SETTING
Press MENU -> select REC/OUT Set -> REC FORMAT with the SEL/PUSH EXEC dial.

Adjusting the Zoom
The Sony HDR-AX2000 has three options for adjusting the zoom to make it easy no matter how you are filming.
 USING THE POWER ZOOM LEVER
The power zoom lever is located on the side of the camera with the hand strap. While hand is in strap you can use your pointer and middle finger to adjust the zoom.
W stands for Wide View (wide angle)
T stands for Close View (telephoto)


USING THE HANDLE ZOOM
1) Set the handle zoom to VAR of FIX on the side of the handle.
VAR- allows you to zoom in or out at a variable speed.
FIX- allows you to zoom in or out at a fixed speed.
SETTING FIXED SPEED
You can select the zoom speed for the FIX position of the handle zoom switch from [1] slow to [8] fast. The default setting is [3]
Press MENU -> CAMERA SET -> HANDLE ZOOM -> Select Zoom Speed


USING THE ZOOM RING
You can zoom at the desired speed by turning the zoom ring. Fine Adjustment is also possible.
Adjusting the Focus Manually
You can adjust the focus manually for different recording conditions.
Examples:
• To record animal(s) behind a tree branch or limbs
• To record horizontal stripes
• To record a subject or animal with little contrast between the subject and is background
 • When you want to focus on the subject in the background (Manipulating Depth of Field)
 |
| Manual Focus Switch |
1) During recording or standby, set the FOCUS switch to MAN (manual)
2) Rotate the Focus Ring and adjust the Focus

A mountain symbol will appear when you can not adjust the focus any farther
A person symbol appears when you cannot adjust the focus any closer.
* It is best to adjust the FOCUS while using a tripod or a tree arm or some kind of camera support
* It is easier to focus on the subject when you use the zoom function. Move the power zoom lever towards T (telephoto) to adjust the focus, and then, towards W (wide angle) to adjust the zoom for recording.
* When you want to record a close-up image of an animal/subject, move the power zoom lever towards W (wide angle) to fully magnify the image, then adjust the focus
USING EXPANDED FOCUS
[EXPANDED FOCUS] is assigned to the ASSIGN 7 button.
1) Press the ASSIGN 7 button.
2) [EXPANDED FOCUS] appears and the center of the screen is magnified by about 2.0 times. it will be easier to confirm the focus setting during manual focusing. The screen returns to the original size when you press the button again.
Adjusting the Image Brightness
You can adjust the image brightness by adjusting the iris, gain, or shutter speed, or by reducing the light volume with the ND (neutral density) filter.
ADJUSTING THE IRIS

 |
| 1. Large Aperture 2. Small Aperture |
1) During recording or standby, set the AUTO/MANUAL switch to MANUAL.


2) Press the IRIS button and the A (automatic) next to the iris value on the LCD screen disappears, or the iris value(F-stop number) appears on the screen.
3) Adjust he iris with the IRIS ring to the F-stop that you are looking for.
* The F value becomes close to F3.4 as the zoom position changes from W to T even when you open the aperture by setting the F value lower than F3.4
* The range of focus, an important effect of the aperture, is called Depth Of Field. The depth of field gets shallower as the aperture is opened, and deeper as the aperture is closed. Use the aperture creatively to obtain the desired effect in your outdoor videography. This is handy for making your background blurred or sharp.
 |
| f/8.0 |
 |
| f/5.6 |
 |
| f/2.8 |
TO ADJUST THE IRIS AUTOMATICALLY
Press the IRIS button until the A (automatic) appears next to the iris value (f-stop) on the LCD screen, or set the AUTO/MANUAL switch to AUTO.
* When you set the AUTO/MANUAL switch to AUTO, other manually adjusted items (gain, shutter speed, white balance) also become automatic.
ADJUSTING THE GAIN
Gain is an electronic amplification of the video signal. This means that the signal is boosted electronically, adding more voltage to the pixels on your imager (CCD or CMOS) causing them to get amplify their intensity and therefore brighten your image. - From Production Apprentice (click there to learn more about GAIN)AGC- Automatic Gain Control
 |
| Example of Gain from Production Apprentice |
*For broadcast practices, I recommend never exceeding 12dB. For personal use, you can select as high as gain as you want, but remember the more gain you add the more pixilated and dotty your image becomes.
1) Press the MENU button
2) Select CAMERA SET
3) AGC
4) Set the limit

GAIN SET
 The AX2000 gives you 3 assignable Gain buttons (L,M,H) that you can pick (on manual mode) to set the gain to that while filming. You can set the values for H, M, and L positions of the GAIN switch. The default settings of H is 12dB, M is 9dB, and L is 0dB.
1) Press the MENU button
2) Select CAMERA SET
3) Select GAIN SET
4) Choose L, M, or H
5) Set the dB for the letter you chose.
6) Press MENU button to hide your settings.

1) During recording or standby, set the AUTO/MANUAL switch to MANUAL
2) When the gain is automatically adjusted, press the gain button. The A (automatic) next to the gain value on the LCD screen will disappear, or the gain value appears on the screen.

3) Set the gain switch to H, M, or L. The gain value set for the selected gain switch position appears on the screen.
ADJUSTING THE SHUTTER SPEED
 You can manually adjust and fix the shutter speed. You can make a moving subject look still or emphasize the movement of a moving subject by adjusting the shutter speed. This is important to play with around moving objects such as cars, water, and people/animals. Play around with this feature to determine the creative look that you are looking for.
1) During recording or standby, set the AUTO/MANUAL switch to MANUAL

 3) Change the shutter speed displayed on the screen by turning the SEL/PUSH EXEC dial.
You can adjust the shutter speed displayed on the screen by turning the SEL/PUSH EXEC dial. You can adjust the shutter speed in a range of 1/4 second through 1/10000 second.
The denominator of the set shutter speed appears on the LCD screen.
4) Press the SEL/PUSH EXEC dial to lock the shutter speed.
*You can set a shutter speed between 1/3 second and 1/10000 second with the frame rate of 24p or 24p SCAN.
*ALWAYS use a tripod or a camera support system when adjusting shutter speed because it is difficult to focus automatically at a lower shutter speed. Manual focusing with your camcorder attached to a tripod or camera support system is what I recommend.
* When filming under fluorescent lamps, sodium lamps, or mercury lamps, the picture may flicker or change colors, or you man have horizontal bands of noise. You may be able to improve the situation by adjusting the shutter speed.
ADJUSTING THE ND FILTER (volume of light)
You can record the subject clearly by using the ND filter when recording environment is too bright.
The ND Filters 1, 2, 3, reduce the volume of light to about 1/4, 1/16, and 1/64 respectively.
During automatic mode an ND1, ND2 or ND3 will flash on the LCD screen suggesting that you set the ND filter respectively.
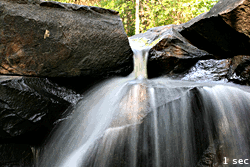
I did this example of clouds in the sky on a sunny day:


Notice how the clouds become more pronounced as the ND Filter is increased.
*IF you change the ND filter while recording, the movie and the sound may be distorted.
* While recording a bright subject, diffraction may occur if you close the aperture further down, resulting in a fuzzy focus (this is common phenomenon with video cameras). The ND filter suppresses this phenomenon and gives better recording results.
ADJUSTING THE WHITE BALANCE
You are going to want to adjust the white balance according to the lighting conditions of your recording environment.
Here is a good blog on "Understanding White Balance" (click to go to blog)
The AX2000 allows you to store two white balance presets (good if you are filming in the same location with the same lighting as in a studio setting). White balance values adjusted for light sources can be stored in memory A and memory B. Unless a white balance is readjusted, values will remain even after the power has been turned off.
There is another preset for Outdoor which is good when recording neon signs or fireworks, sunset/sunrise, just after sunset or just before sunrise, and under daylight color fluorescent lamps.
There is also a preset for Indoor which is good for shooting under the lighting conditions that change in many ways, such as a party hall, under strong light as in a photography studio and under sodium lamp or mercury lamps.
To Save the Adjusted White Balance Value in Memory A or B
1) During recording or standby, set the AUTO/MANUAL switch to MANUAL

2) Press the WHT BAL button.

3) Set the white balance memory switch to A or B (whichever one you want to set).

4) Capture a white subject, such as white paper, full-screen in the same lighting condition as the one in which the subject is. Press the White Balance symbol button once. A or B starts flashing rapidly. It will stay on when the white balance adjustment is completed and the adjusted value is stored in A or B.

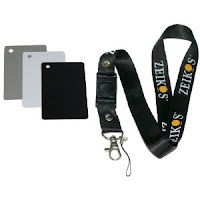
In this example I used a plain white sheet of paper:

You can also buy "White Cards" like this Zeikos one on Amazon for $13
 You can also manipulate what the camera "sees" as white for more creative controls.
*The best way is to get out there and practice setting your white balance outdoors and using different scales of white, grey and black to manipulate the camera and then see how the color of what your recording changes.
CUSTOMIZING THE PICTURE QUALITY (picture profile)
You can customize the picture quality by adjusting picture profile items such as GAMMA and DETAIL.
There are 6 available Picture Profiles that you can either a) use the default recording settings or b) customize the profile pictures for your common shooting settings, so that you don't have to waist time resetting all the settings and you can just go in and select which profile picture you want (1-6)
Here are the default Picture Profiles:
| Picture Profile Number | Recording Condition |
| PP1 | You can assign your own setting |
| PP2 | You can assign your own setting |
| PP3 | Appropriate setting to record people |
| PP4 | Appropriate setting to record film-like pictures |
| PP5 | Appropriate setting to record sunset |
| PP6 | Appropriate setting to record black and white pictures |
Selecting/Modifying a Picture Profile:
1) During standby, press the PICTURE PROFILE button

2) Select a picture profile number with the SEL/PUS EXEC dial.

3) To select a profile picture number scroll to the right one and press the ok button
4) To cancel the picture profile select the OFF picture profile choice
5) To change the picture profile select the one you wish to change and follow the menu to change the different settings such as Gamma, Color Mode, Color Level, Color Phase, WB shift, Detail, Skintone detail
GAMMA
| Item | Description and settings |
| [STANDARD] | Standard gamma curve |
| [CINEMATONE1] | Gamma curve 1 for producing tone of film camera images |
| [CINEMATONE2] | Gamma curve 2 for producing tone of film camera images |

GAMMA Image Example:

TYPE1
Creates a look similar as when a film-originated movie is viewed on television. The slope of the gamma curve in dark areas is suppressed, creating a deep black tone, while the mid-tone to highlight areas maintain detailed contrast.
TYPE2
Suppresses the dark areas even further, creating a deeper black reproduction.
COLOR MODE
| Item | Description and settings |
| [TYPE] | Selects a type of colors. [STANDARD] : Standard Colors [CINEMATONE1] : Film camera image-like colors good with [GAMMA] set to [CINEMATONE1] [CINEMATONE2] : Film camera image-like colors good with [GAMMA] set to [CINEMATONE2] |
| [LEVEL] | Sets a color level when you set [TYPE] to the settings other than [STANDARD]. 1 (close to color settings of Standard) to 8 (color settings of the selected type) |
COLOR LEVEL
| Item | Description and settings |
| -7 (light) to +7 (dark), -8: Black & White |

COLOR PHASE
to set the color phase
| Item | Description and settings |
| -7 (greenish) to +7 (reddish) |
WB SHIFT
to set items for the white balance shift
| Item | Description and settings |
| [LB[COLOR TEMP] | Sets a color temperature offset value. -9 (blueish) to +9 (reddish) |
| [CC[MG/GR]] | Sets a color correct offset value. -9 (greenish) to +9 (magentish) |
DETAIL
to set items for the detail
| Item | Description and settings |
| Sets the detail level -7 to +7 |
SKINTONE DETAIL
to adjust the detail of skinetone areas to reduce wrinkles
| Item | Description and settings |
| [ON/OFF] | Suppresses details in skin-tone areas to reduce wrinkles. Select [ON] when you want to use this function. You can also select other areas |
| [LEVEL] | Sets the adjustment level. 1 (less adjust the detail) to 8 (more adjust the detail) |
| [COLOR SEL] | Sets color items for the detail adjustment [PHASE] : Sets the color phase. 0 (purple) -> 32 (red) -> 64 (yellow) -> 96 (green) -> 127 (blue) [RANGE] : Sets the color range. 0 (selects no color), 1 (narrow; selects a single color) 31 (wide: selects multiple colors in similar color phases and saturation) The detail will no be adjusted when you set [RANGE] to 0. [SATURATION] : Sets the color saturation. 0 (selects a light color) to 31 (selects a deep color) |

This feature softens up the faces of those being filmed to give them that more "flawless" look
Audio Setup
The AX2000 incorporates the XLR ports for audio that allow you to use simultaneously a wireless mic and shotgun microphone.
XLR PORTS

CHANNEL SETTING:
1) Select input sources with the CH1 (INT MIC/INPUT1) switch and the CH2 (INT MIC/INPUT1/INPUT2) switch.

Recording channels:
When CH1 is set to INT MIC (internal microphone) and:
• CH2 is set to INT MIC then the L INT Mic is being recorded on CH1 and the R INT MIC is being recorded on CH2.
• CH2 is set to INPUT 1 then mono INT MIC is being recorded on CH1 and XLR INPUT1 is being recorded on CH2.
• CH2 is set to INPUT 2 then mono INT MIC is being recorded on CH1 and XLR INPUT2 is being recorded on CH2.
When the CH1 is set to INPUT 1 and:
• CH2 is set to INT MIC then XLR INPUT1 is being recorded on CH1 and mono INT MIC is being recorded on CH2
• CH2 is set to INPUT1 then XLR INPUT1 is being recorded on CH1 and CH2.
• CH2 is set to INPUT2 then XLR INPUT1 is being recorded by CH1 and XLR INPUT2 is being recorded by CH2
*You can adjust CH1 and CH2 audio levels separately
1) Set your correct Input sources and audio levels
2) Set the INPUT 1 switch to an appropriate position for the microphone connected to the INPUT1 jack.

Line: For inputting sound from an audio device
MIC: for inputting sound from an external microphone that does not support +48V power source
MIC+48V: For inputting sound from a device that supports the +48V power source.
When you connect a microphone to the INPUT2 jack, set the INPUT2 switch to an appropriate position for that microphone.
Assigning the functions to the ASSIGN buttons
Some functions can be assigned to the ASSIGN buttons for easy use. You can assign a single function to any one of the ASSIGN 1 to 7 buttons.


Functions you can assign to the buttons:
- EXPANDED FOCUS (ASSIGN 7 button)
- PUSH AUTO IRIS
- IRIS RING ROTATE
- AE SHIFT (ASSIGN 5 button)
- BACK LIGHT
- SPOTLIGHT
- STEADYSHOT
- D.EXTENDER
- FADER
- COLOR BAR
- ZEBRA (ASSIGN 4 button)
- PEAKING
- MARKER
- REC LAMP
- VISUAL INDEX (ASSIGN 6 button)
- MODE
HOW TO ASSIGN Buttons
1) Press the MENU button
2) Select OTHERS –> ASSIGN BUTTON withe the SEL/PUSH EXEC dial
3) Select the ASSIGN button to which you want to assign a function with the SEL/PUSH EXEC dial
• [-------] appears if no function is assigned to the ASSIGN button
4) Select the function that you want to assign with the SEL/PUSH EXEC dial
5) Select [OK] with the SEL/PUSH EXEC dial
6) Select RETURN with the SEL/PUSH EXEC dial
7) Press the MENU button to hide the menu screen.
PLAYBACK
You can play back movies as follows:
1) Press the VISUAL INDEX button
The VISUAL INDEX screen appears after a few seconds.

2) Play back movies.
- Touch the recording media you want to play back (Memory card slot A or B)
- Touch the playback mode [HD], and select the desired image quality of movies [HD], [SD] or [camera]
- Touch twice the thumbnail of the movie you want to play back. The first touch will show the information on the movie at the lower part of the screen including: Date and time of recording started, resolution, frame rate, record mode, duration, time code,
Capturing still images from a movie
You can save a selected frame from a recorded movie as a still image.
1) Press the MODE button
2) (on the LCD screen) Touch [EDIT] –>[PHOTO CAPTURE] –> select the desired memory card and image quality.
3) Touch the movie to be captured. The selected movie starts playback
4) Touch the play/pause button at the point where you want to capture. The movie pauses. Play and pause toggles as you press the play/pause button. (you can make fine adjustments using the rewind, fast forward buttons
5) Touch OK
The captured still image is saved on the memory card selected for movies. When capturing is finished, the screen returns to pause. You can continue to capture still images by press play again and repeat steps 4.
ADVANCED FEATURES AVAILABLE:
1) MENU button

2) DISPLAY SET with the SEL/PUSH EXEC Dial
3) Select one of the following:
Zebra: You can display a zebra pattern as a guide for adjusting brightness.
You can use the zebra pattern to identify areas that might be overexposed, so you can correct the exposure appropriately. The camcorder offers two levels of zebra pattern. The symbol is a zebra pattern with a 100 for 100% or a 70 for 70%. The 100% shows only areas that will lose detail and will be identified by the highlighted areas. On 70% zebra the highlighted areas will also identify areas that are dangerously close to losing detail. More about Zebra Patterns Here
• ON/OFF : when you select ON the Zebra strip icon and the brightness level appear on the screen. The zebra pattern will not be recorded with the image. The default setting is OFF.
• LEVEL: You can select the brightness level between 70 and 100 and 100+. The default settings is 70.
* You can assign an ASSIGN button to work as [ON/OFF]

Peaking:
Peaking is used to help adjust the focus.
When peaking is activated, edges in focus on the screen will be highlighted in red, yellow or white.

• ON/OFF: When you select ON Peaking appears and you can display an image on the screen with its outlines enhanced. The default setting is OFF
• COLOR: You can select a peaking color. The default color is white
• LEVEL: You can select a peaking sensitivity from [HIGH], [MIDDLE], and [LOW]. The default setting is [MIDDLE]
*The enhanced outline will not be recorded on the memory card.
*You can focus more easily using this function in combination with the expanded focus function.
* You can assign an ASSIGN button to work as [ON/OFF]

Marker:
Markers are used to help frame your shot.

• ON/OFF: When you select ON, you can display markers. The default setting is [OFF]. Markers will not be recorded on the memory card.
• CENTER: When you select ON, you can display a marker at the center of the screen. The default setting is [ON]
• GUIDEFRAME: When you select ON, you can display frame markers that help you to check horizontal and vertical positions of a subject. This is what you can use to help follow the Rule of Thirds. Click here to read more about the Rule of Thirds. The default setting is [OFF]

Transferring Video Clips to a Computer
STEP 1) Check with the manual if your computer system complies with the video camera. (pg. 81)
STEP 2) Installing the supplied software "Content Management Utility"
• Install "Content Management Utility" before connecting your camcorder to a computer.
1. Confirm that your camcorder is not connected to the computer
2. Turn on your computer.
3. Place the supplied CD-ROM "Content Management Utility" in the disc drive of your computer. The installation screen appears.
4. Select the language for the application to be installed, then click OK
5. When the install wizard screen appears, click NEXT
6. Confirm the license agreement, and if you accept the terms, click NEXT
7. Select the drive or folder to install the application, then click NEXT
8. Select the option to create the desk-top shortcut, then click NEXT
9. Turn on your camcorder, then connect the camcorder to the computer using the supplied USB cable. The USB SELECT screen appears on the camcorder screen automatically.
10. Touch A or B on the camcorder screen.
11. Click NEXT
12. Follow the on-screen instructions to install the software.
13. After installation, you are free to use the software to transfer your footage from the camcorder to the computer.
About this tutorial:
This is a © Copyrighted Blog, pictures and information from Canon and Campbell Cameras and should not be used without their permission, by email Johanna@Campbelloutdoorchallenge.com, by phone: 618-382-7939 or by mail:
Campbell Cameras
Attn: Johanna Campbell
1327 Co. Rd. 800 N.
Carmi, IL 62821


This was very helpful thanks!!!
ReplyDeleteGREAT instructions!!! How is the counter reset?
ReplyDeleteTo reset the recording time back to 00:00:00? Yes that is an option on this camera
ReplyDeleteI love you for this! :D :D Next week I'm going to try what else my hdr-ax2000 can do, so i will use your guide. Thanks a lot! ;)
ReplyDeletePicture Profile for weddings? Outside and inside?
ReplyDeleteAnonymous- I am not sure what your question is asking? Can you be more detailed?
DeleteI bought AX2000 outside US in january 2013 and surprisingly the only things different in this camera is its formats,,starts with 1080/50i FX - 1080/25p FX and i wonder why i didn't notice that when i was buying it... but the looks and EVERYTHING ,all other functions the same.I shot some weddings with it and i still not satisfied with resolution,,it's not that crisp clear .Does it have to do with shutter speed? It's really good outside with enough light but inside is not giving me the look i want. here is one of wedding trailer ,,you can see the resolution
ReplyDeletehttps://vimeo.com/67016705
and also this one i shot outside but it's like its lens doesn't do a good job in humid or heat.
https://vimeo.com/66531783
Thank you so much for this great detailed guide site.I learned a lot from you..thanks
Marzi
Marzi,
DeleteI believe the AX2000 that you got is the PAL version whereas the one mentioned in this article is the NTSC (USA) version.
Video equipment sold in the US , Canada , Mexico , and Japan is designed to record and playback video images at 525 lines-per-frame @ 60 frames-per-second. This is commonly known as an NTSC format (National Television Standards Committee).
Video equipment using the European broadcast standard (PAL) is designed to record and playback video images at 625 lines-per-frame @ 50 frames-per-second.
PAL and NTSC are not interchangeable recording formats.
I have not worked with PAL cameras and I am not sure why you are having resolution trouble. I am sorry that I couldn't be more help to you!
Lots of valuable info here but...
ReplyDelete1. is there an actual setting where I turn on the digital zoom? I do not find one and do not see any indication of leaving optical zoom and entering the digital zoom zone.
2. where can I find a reference to which recording formats are used for a particular situation?
Thanks very much,
Paul Rujez