


I am going to challenge you for the next day that when you watch television or a movie to pay attention to the lighting. The videographers are not just taking an expensive camera and pressing record; there are a lot of other details that go into creating the perfect shot. One of these details is lighting. Being an outdoor videographer you might think that the only lighting issue you have to deal with is low light situations when you are at your peak of hunting. Wrong! Good lighting can take your video footage and/or tv show to a Discovery, National Graphic and History channel level of videography. The color, direction, quantity and quality determine how your subjects appear.
Lighting for the Outdoors
"Daylight and sunlight are not a constant source, because they change hourly and with the weather, season, location, and latitude. This changing daylight can alter the apparent shapes, colors, tones, and forms of a scene. The color of sunlight changes most rapidly at the extreme ends of the day. Strong color changes also occur during storms, haze, or mist and on blue wintery days. The direction of light changes as the sun moves across the sky. The shape and direction of shadows are altered, and the different directions of sunlight greatly affect the appearance of a scene. The quality of sunlight depends on its strength and direction. Strong, direct sunlight is "hard" because it produces dark, well-defined shadows and brilliant highlights, with strong modeling of form. Sunlight is hardest on clear summer days at noon. Strong sunlight makes strong colors more brilliant, but weak colors pale. Sunlight is diffused by haze, mist, and pollution in the air. This diffused or reflected light is softer; it produces weak, soft shadows and dull highlights. Directionless, diffused sunlight is often called "flat" lighting because it produces fine detail but subdues or flattens form. Weak, directionless sunlight provides vibrant, well-saturated colors." – From Photo Composition Articles

 |
| Portrait Look |
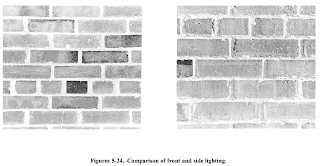
To give your subject an impression of form, depth, and texture, you should ideally have the light come from an angle or the side. Take a look at the image below of the brick wall. Notice when the light is directly facing the wall, the bricks looks smooth and flat (1st picture). Now look how positioning the light to the side gives picture 2 depth and creates texture in the brick.
A subject who is wearing a ball cap or any other hat cast even more shadows in strong light, creating harsh shadows.
 |
| Bad Lighting |
Tip: Eye contact is a known way of establishing sincerity, emotion, and a way to establish a relationship with the audience. Creating lighting situations where your subject's eyes can not been seen, will draw your audience's attention elsewhere and loose focus on your video.
If you are shooting non-hunting material where the sunlight is behind your subject, there is a way to correct the lighting using a reflector. A reflector is an improvised or specialized reflective surface used to redirect light towards a given subject or scene. Reflectors come in all different shapes and sizes, with many of them having the ability to fold down into compact and portable configurations. A reflector will reflect available light into those areas of your subjects face that would be in shadow without it. Quite often the best place for one is below your subjects face reflecting light back up into those dark under-spots.To use a reflector you're going to want to get it pretty close to your subject – without getting into the frame. Reflectors can be used anytime that there is shadows casting on your subject. You want to position the reflector so that it's glow bounces back up to light up your subject's face. What you should be looking for is a nice even light with no shadows (or shadows where you creatively place them). Keep positioning the reflector until you achieve the look that you are going for.
You can manipulate the color, tone and intensity of the shot by using different colors and sizes of reflectors. Lets take a look at how changing the color of the reflector can change the mood of the shot.
White Reflectors - Provide the softest, most even fill.


 |
| Left: No Reflector Right: White Reflector |

Gold Reflectors - Give off a "warm" tone.
 |
| Gold Reflector |
 |
| "Soft" Gold Reflector |
Example from GrayPhotograph.com:
In this behind the scenes image below, you can see that the place we wanted to shoot (in-between these nasty old trailers) was actually very dark and the light was pretty bad. We liked the light that was coming in behind our subject, but the light on the front was terrible. So in this instance we bounced some direct sunlight into where our model was in order to light here face. At first we tried using white side of the reflector to get the softest look we could, but the white just didn’t reflect a strong enough light source onto her because she was so far away from the reflector. We then went for the silver/gold side of our reflector. The problem with that was it looked too much like a spotlight and because we were so far away, the light was also very harsh. So what we did was first position the bottom of our reflector at chin height so it would hit her in the most flattering way, then, we used what’s called a feathering technique to slightly soften the light. We did that by shooting the bright light at her, then ever so slightly panning the light to the side so that it tapers off a bit and does not seem so harsh.


Apply these photography techniques to your video.
Silver Reflectors- Gives off a "cool" feel to the shot. Silver adds more light than white. It is like a mirror, it reflects what it sees. Outside the Silver reflectors will give the shot a "cool" look because it is reflecting the blue from the sky.

Using the sky to manipulate your light with a silver reflector:

"This is how we created the first shot. Triflash through with a Skylite Panel & a silver reflector for bounce. Used the grey-ish sky as my background. The ability to light just opens up so much possibility in our shoots." - From Louis Pang

Black Reflectors- Are opposite of other reflectors because they absorb light. Used to "shade" light.


When you watch TV shows or Movies or even look at photographs, you don't realize the amount of setup that it takes to capture those shots. You can manipulate light by using one of the 5 in 1 reflectors and having a partner to hold the reflector.
Here are some different size options for reflectors:


Remember that Photography came before Cinematography; therefore, there is a lot to learn from photography.
I can guarantee that a lot of hunting shows are not using these simple techniques. You might be thinking, "Why should I use them then?" You should use them because they will take your tv show, dvd, or home video to a new professional level.
The best way to master these lighting techniques is to practice! I suggest taking a plant or something stable and then just start using all the different filters at different times of the day.
These are not rules that you have to follow, they are ideas to spark your creativity!


I enjoyed this article. Thanks!
ReplyDelete