

The camera used in this guide is the Canon HFS20. It is basically the same for the Canon HFS200, HFS21, and HFS30

Using the Touch Screen
 The LCD screens on the Canon HFS series of cameras are touch screen activated. To access all the options you touch the "FUNC." to bring up the list of functions. To scroll through the options you swipe your finger up and down or left and right across the screen to scroll menus, to browse through index screen pages or to adjust slider controls (ex. volume).
* You must press firmly when using touch operations
* The touch screen will not function properly when you are operating the touch screen with wet or gloved hands or using your fingernails or other hard-tipped objects. It will not function if you apply excessive force or forcefully scratching the screen
* The screen will also not work if you apply a screen protector on top of the touch screen.

Setting up the Record Method
Each of the Canon HFS series camcorders have 2 SD card slots (located on the left side of the camera once the LCD screen is out). The Canon HFS 20 and the Canon HFS 21 have internal memory as well as the 2 SD card slots. The memory cards that are recommended for these cameras are Class 6 SDHC memory cards. When inserting and removing SD Cards make sure that the camcorder is turned OFF. To open the SD card slot you simply slide the cover to the right. When inserting the SD cards make sure that the label is facing the front of the camcorder. Push the memory card once to release it.
 To set up where your want your media to be recorded to you access the "FUNC" > "MENU" > 2nd tab (looks like a film reel with a box behind it) > either "Rec Media for Movies" of "Rec Media for Photos" You now have the option to set where you want your Video or Photos to be recorded. Slot "A" or "B". If you have the Canon HFS 20 or the HFS 21 you have the option of storing your media on the internal memory as well. If you are using your video camera to take both video and pictures, I would recommend setting your Videos to record to SD card slot "A" and then under the photo mode to set your photos to record to slot "B". This is an easy way to access your different files. To set where you want your Photos to be stored you follow this same step but in the "Photo" mode. The Canon HFS series of cameras have what is called "Relay Recording". You can activate the relay recording so that if the memory you are using becomes full while recording movies, the recording will continue uninterrupted on a memory card. To set this feature up you follow the steps above and just touch the "Relay Recording" button so that it is highlighted.
Standby Mode
The Canon HFS series of camcorders has a standby function that you enter by closing the LCD Screen. The camera will then use 1/3 the power it uses while recording. Additionally, when you open the LCD panel or pull out the viewfinder(HFS21 only) the camcorder is ready to start recording in approximately 1 second, allowing you to record your hunt right away!
When you are in recording mode, close the LCD screen and the green indicator light will turn to orange to indicate that you are in standby mode.
Zooming
There are 3 different ways that you can zoom in and out: using the zoom lever on the camcorder, using a remote control, and using the touch screen. The Canon HFS series of camcorders include a 10x optical zoom. It also includes a 200x digital zoom. I would never used the digital zoom because it will cause your image to appear pixilated(dots).
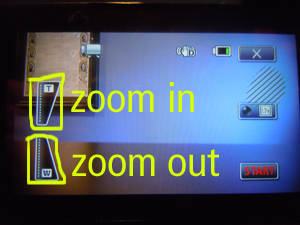
Zooming on the Touch Screen: to access the zoom function on the touch screen your touch "FUNC" > "Zoom" then the "Zoom T and Zoom W" appear on the screen. You touch anywhere in the "T" zone to zoom in and anywhere in the "W" zone to zoom out.
You can also manually set the zoom speed by accessing the "FUNC" > "Menu" > "Zoom Speed" (3 is the fastest; 1 is the slowest)

Manual mode is important to use when out in the field because the camera will want to focus on what is in the front of the lens, therefore if you have tree branches in front of the deer the camera will want to focus on the limbs instead of the deer.
To enter Manual Mode (M) you set the "Mode Switch" to "M"
Selecting the Video Quality
The HFS series camcorders offers 5 recording modes. Changing the recording mores will change the recording time available on the memory cards. Select "MXP" or "FXP" for better movie quality; select "LP" for long recording times. "MXP" and "FXP" will record in 1920 x 1080. "MXP" records 24mbps and "FXP" records 17mbps. The difference is that the "MXP" higher bitrate means not as lossy, and generally better quality. The default Recording Mode Setting is "SP"


Image Stabilization Modes
The image stabilizer reduces camcorder blur (do to movement of the camcorder) so you can get nice, stable shots. There are three different modes to choose depending on the shooting conditions.
Dynamic (Hand shake symbol with a D in the right corner) - Compensates for higher degree of camcorder shake, such as when shooting while walking, and is more effective as the zoom approaches full wide angle (W)
Standard (Hand shake symbol) (Hand shake symbol with ON) - Compensates for a lower degree of camcorder shake, such as when shooting while remaining stationary, and is suitable for shooting natural-looking scenes. Use this setting when recording movies with the optional Wide-conver or Tele-converter lenses.
Off (Hand shake symbol with OFF) - Use this setting when the camcorder is mounted on a tripod, monopod, boatpod, or treearm
Powered IS
When shooting video, you can used the Powered IS button (located on the bottom left side off the LCD viewfinder) to make the image stabilization even more powerful. Powered IS is most effective when you are stationary and zooming in on far subjects using high zoom ratios. Holding the LCD panel with your left hand will add to the stability of the shot. To activate the Powered IS you press and hold the Powered IS button as long as you want it activated. The hand shake symbol with a P will show up yellow on the LCD screen to let you know that it is activated.
Pre-Recording
The Canon HFS series models have a function that is called "Pre-Recording," which allows the camera to record 3 seconds before you actually press the record button. What this does is records 3 seconds of clips in a loop until you press the record button. This is a great feature to use when you don't want to miss recording opportunities and is especially useful in hunting situations when it is difficult to predict when you need to start recording.
To turn on Pre-Recording touch the "FUNC" > "Pre REC" > ON> X to exit
This feature will be deactivated if you leave the camera without any action for 5 min. or more or when you are in or coming out of standby mode.
Touch and Track
When recording people, face detection will track the main subject and adjust the optimal settings. But, also when recording other moving subjects such as deer or any other animal, you can use Touch and Track to keep your subject in focus and achieve the best results.
 To use this feature you must have the "Face Detection" set to on. To do this you touch the "FUNC" > "MENU" > "FACE DETECTION" > "ON". To track an animal or another moving object you will then touch the screen where that object is located and it will put a white double frame box around that object and it will track it and keep it in focus while it is on the screen. You can cancel this track by pressing the cancel button. This is a great feature to use when you want to keep your animal in focus, especially while in the woods where the tree branches could get in your way.
Peaking
Peaking can help you achieve correct focus when focusing manually. While peaking is activated, the outlines of subjects that are properly in focus are emphasized and shown in color. You can use the black and white setting to create an even stronger contrast, making it even easier to verify if the subject is in focus.

 |
| Black & White with Blue Peaking |
 |
| Black & White with Red Peaking |
Manually set the Shutter Speed and Aperture
 |
Shutter Speed from Wikipedia |
P Programmed AE - The camcorder automatically adjusts the aperture and shutter speed to obtain the optimal exposure for the subject
TV Shutter-Pri. AE - Set the shutter speed value. The camcorder automatically sets the appropriate aperture value
AV APerture-Pri. AE - Set the aperture value. The camcorder automatically sets the appropriate aperture value.
Shutter Speed is used to discuss exposure time, the effective length of time a camera's shutter is open. The total exposure is proportional to this exposure time, or duration of light reaching the film or image sensor (Wikipedia)
• With a slower shutter speed you can add a nice motion blur and sense of movement
• With a faster shutter speed you can "freeze the action" for powerful images or moving subjects.
To adjust the shutter speed you use the TV Shutter-Pri. AE under the "REC Programs"

 |
| Slow Shutter Speed (Photo Composition Articles) |
Aperture stop of a photographic lens can be adjusted to control the amount of light reaching the film or image sensor. In combination with variation of shutter speed, the aperture size will regulate the film's or image sensor's degree of exposure to light. Typically, a fast shutter speed will require a larger aperture to ensure sufficient light exposure, and a slow shutter speed will require a smaller aperture to avoid excessive exposure. In general, the smaller the aperture (larger the number), the greater the distance from the plane of focus. (Wikipedia)
• With small aperture values only the subject is in focus and the background is softly blurred. Great for portraits or to isolate a single object.
 • With large aperture values every part of the image is clearly in focus. Good for lansdapes and architectural shots.The lower the F stop the more light that the lens can pick up (better in low-light situations)
To adjust the Aperture you use the "AV APerture-Pri. AE" under the "REC Programs"
 |
| Large Aperture Photo from SLR Photography Guide |
 |
| Small Aperture Photo from African Freak |
Using the Zebra Pattern
You can use the zebra pattern to identify areas that might be overexposed, so you can correct the exposure appropriately. The camcorder offers two levels of zebra pattern. The symbol is a zebra pattern with a 100 for 100% or a 70 for 70%. The 100% shows only areas that will lose detail and will be identified by the highlighted areas. On 70% zebra the highlighted areas will also identify areas that are dangerously close to losing detail. More about Zebra Patterns Here
The zebra highlighted patterns will show up on the LCD screen and will not be recorded. To show these zebra patterns you touch "FUNC" > "EXPOSURE" > wrench symbol > then choose "70%" or "100%"

Manual Exposure Adjustment
After you have your zebra patterns on your LCD screen, you can choose to manually fix the exposure if the zebra patterns are on your subject. Your subjects can appear too dark (underexposed) or too bright or glaring (overexposed).
To adjust the exposure manually, I recommend first setting the zebra patterns at 70% or 100%, so that you have a visual of the overexposed places in your shot. Once your have set your zebra pattern you can adjust the exposure on that screen by touching anything in the +/- frame. The white X symbol will flash and the exposure will be adjusted automatically. You can also adjust the exposure manually by touching the "M" button and use the manual adjustment dial. To return to automatic exposure you simply touch the "M" button again.
Automatic Gain Control (AGC)
When recording around sunrise and sunset or other dark situations, the camcorder will automatically increase the gain to try to get a brighter picture. However, using higher gain values may result in more noticeable video noise (image looks pixilated or dotty). You can select the AGC limit to curb the amount of noise by setting the maximum gain value to be used. The smaller the AGC limit, the picture will be darker but will have less the noise. The standard for Broadcast Standards is not to exceed 12db of gain.
To activate a Automatic Gain Control (AGC) touch "FUNC" > "AGC" > "M" for manual > Then use your finger to drag the dial to set it to the limit

White Balance
The White Balance function helps you to accurately reproduce colors under different lighting conditions so that white objects will always look truly white in your recordings.
To access White Balance options touch "FUNC" > "WB" (white balance)
The best way to set up white balance is to use a White Card, a piece of white paper or anything that is solid white.
To set the custom white balance ("Custom WB") you point the camcorder at the white object, so that it fills the whole screen, and touch "Set WB"
There are different options that you can select as well:
"AWB" Automatic- The camcorder automatically sets the white balance for natural looking colors
Daylight - To record outdoors on a bright day
 |
| A good scene to use "Daylight" |
Shade - To record in shaded places
Cloudy - To record on a cloudy day
 |
| The Cloudy (shown on left) Warms the hands up compared to Auto WB on right |
Fluorescent - To record under warm white, cool white or warm-white-type fluorescent lighting
 |
| Auto WB(right) can't correct fluorescent illumination. That is what the Fluorescent does (left). *Notice the white sheet in the left and how it is yellow in the right. |
Fluorescent H - To record under daylight or daylight-type fluorescent lighting
Tungsten - To record under tungsten and tungsten-type fluorescent lighting.
Custom WB- Use the custom white balance setting to make white subjects appear white under colored lighting.
 |
| Custom White Balance |
 |
| Auto White Balance |
For best results, rely on the Custom WB. A good way to set this up is when you first get to your hunting location to set the white balance right then and there and it will stay the same if you go into standby or power off.
Managing the Audio Levels
Another important aspect to take into consideration while filming is your audio levels (the levels of audio that is being recorded). You can manually adjust the audio levels which will revile the audio meter. I would recommend leaving the audio meter on while filming so that you can keep track of the audio level. This will indicate when the audio is getting distorted (in the red zone close to 0db)
To open the manual audio adjustments screen touch "FUNC" > "MIC. Level" > M (Manual)
• The audio level indicator and current audio recording level will appear on the screen
• Touch "A Automatic" to return the camcorder to automatic recording levels.
• Use the left and right arrows to manually adjust the audio level
• Touch the "X" to lock the audio recording level at the current level.
To display the audio meter while the audio levels are adjusted automatically touch "FUNC" > "Mic. Level" > A Automatic > Audio Level Indicator
I recommend using headphones to check the sound level. You can do this while in Manual or Auto mode. It is recommended to use during manual mode while you are adjusting the audio recording level.
*** Using Headphones ***
The headphone jack (located behind the LCD on the camera) is used both as a headphone jack and a AV OUT jack.
To be able to use the headphones you must activate that port for headphones.
To activate the headphones touch "FUNC" > MENU > Wrench symbol (3rd tab) > AV/Headphones > Headphones
The headphones icon should then appear on the LCD screen
When you turn the camcorder off the port will return to the AV OUT setting and you will have to go in and adjust it again
Remote Control/ Zoom Controller
The Canon HFS series of cameras includes a LANC input option in which you can add a zoom controller. For the Zoom Controller to work the Wireless Remote Control setting must be turned to "ON". To turn on the wireless remote control you touch "FUNC" > MENU > Wrench Symbol (3rd tab) > Wireless Remote Control > ON
©Campbell Cameras
Detailed information(text) and camera images not to be used without CampbellCameras Written Permission


The LCD screens on the Canon HFS series of cameras are touch screen activated. Wow, this is really amazing. I haven't seen touch screen video-camera's, and I want that Canon HFS. Thank you for teaching us on how we can use easily this touch screen Canon HFS.
ReplyDelete