

How To Edit A RAW Timelapse
In our last blog, I shared a SlideShare presentation on how to shoot a RAW Timelapse. In this blog I will walk you through the basic steps on how to edit your RAW timelapse using Adobe Bridge, Adobe Photoshop & Quicktime
Here is the final timelapse (Music & Titles were added in Adobe Premiere Pro)
El Morro National Monument Timelapse - New Mexico from Campbell Cameras on Vimeo.
Why shoot in RAW in the first place?
RAW images give you highest quality images and maximum control over your photos because they do not go through any in-camera processing and maintain all the information. REMEMBER, that when you shoot in RAW the file sizes are LARGE and take up more room on your cards and computer. Therefore, they will take some time to transfer from your DSLR to your Computer.Step 1) Transfer Your RAW Images
I like to transfer my photos and video files directly to an external harddrive, that way I don't waste time transferring them to my computer and than to the harddrive. This also frees up your computer to handle the processing of these images. I suggest putting all your RAW timelapse images into a separate unique folder.
Step 2) Add The Folder to Adobe Bridge

Because I imported my RAW files from my camera to an external harddrive, it is easiest to drag and drop that folder into Adobe Bridge. First, open your Adobe Bridge (I am working in Adobe Bridge CS6). Locate your folder and drag it onto the favorites bar in Adobe Bridge. Once the folder is there, click on it to open the preview files. REMEMBER, these are RAW images and it will take time to load all your preview images.

Step 3) Basic RAW Editing Techniques
I find that the best practice when editing RAW Timelapses is to choose an image, somewhere in the middle and use that image to setup your basic edits.
 A) Single click on an image (somewhere in the middle)

B) Click the "Open in Camera RAW Image
C) Your RAW Edit Panel Appears
Tip: I find it easier to underexpose my image when I take it because you can fix that in your RAW editing tools, you can not fix overexposed.
 D) The first tool we will be using is the White Balance Tool

Presets
Don’t know where to start? Try selecting a preset from the drop-down menu. This is where you can also go back to the White Balance that it was set on when you took the shot.
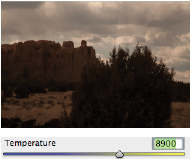
Temperature Slider
The temperature is controlled in Kelvins. Move the slider to the left to add cooler tones or to the right for warmer tones, depending on your image.

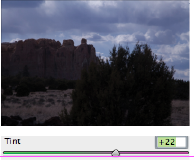
Tint Slider
The tint slider corrects the green or magenta color casts in your image


White Balance Eye Dropper
With the white balance eye dropper tool, select a neutral point in your image. It will then configure the white balance based off of your selection.
For our image, we set the temperature to 5450 and Tint to +5

E) The next tool is the Exposure Slider
The Exposure Slider is measured in stops of light and is used to lighten or darken your image to get the proper exposure.
PRO TIP: Hold down the ALT key while moving the slider left and right to make sure you dont have any Blown out Pixels.
Because I underexposed my image on purpose, I will have better results than if I would have overexposed it.
For this image, I set the Exposure to +1.35


F) Blacks & Whites Slider
The Black & White sliders are used to control the extreme tones of your image
PRO TIP: Hold down the ALT key while moving the sliders left and right to view your clipped pixels. Black Slider - Some clipped pixels are acceptable.
 White Slider- You want it to be at the point right before you have clipped pixels.
For this image, I set the whites to +23 and the Blacks to -3


G) Highlights & Shadows
The Highlights & Shadows sliders allows you to retrieve detail in deep shadows or in blow-out highlights.
If you take a look at the image above, you will notice that the sky is washed out looking and the bush in the foreground has deep shadows on it. To fix this, we will slide the highlights down and the shadows up.


H) Saturation & Vibrance
Saturation controls the intensity of the colors in your image while Vibrance focuses on the intensity of the less saturated colors. Vibrance allows you to control your intensity in portrait shots without changing the skin tone.
For this image, I wanted to increase the blue and green tones, therefore I set the vibrance to +30.


I) Contrast & Clarity
While contrast affects the overall contrast of the image, clarity affects the contrast over the midtones.
Increasing your clarity will increase your details in the image, but if you increase it too much it will looked over-edited.


J) Hue, Saturation, & Luminance
This tab section

The Hue tab changes the shades of the various colors
The Saturation tab either increases or decreases the strength of various colors
The Luminance tab either increases or decreases that color's brightness.
For this example image, I want to increase the blues to bring out the sky. Also, I want to increase the orange in the rocks.


Now, moving onto the Luminance tab. I want to increase the depth detail in the sky. Therefore, I will decrease the Blue luminance. Also, I will increase the intensity of the orange of the rocks.


J) Before & After
Take a look at the image before and after we edited it:

Step 4) Apply to all images
I know what you're thinking, that just took a long time to edit that one photo, but I have tons of images
 to correct. There is a simple solution!

Once you've made the correction to your image, click done. It will take you back to Adobe Bridge where it has applied those changes.
Step 1) Click “Done” after you are done editing your image
Step 2) CTRL click or right click your image that you edited
Step 3) Go to Develope Settings and then select Copy Settings
Step 4) Select all your RAW images
Step 5) CTRL click or right click and go to Develop Settings and then click Paste Settings
Step 6) Click OK
This will take a while to process, but it is batch editing each
image with the settings you used on your first image.

Step 5) Batch Convert to JPEGs
When working with a timelapse, you need your RAW images converted to JPEG and resize them for 1080HD.
Step 1) With all your RAW images selected, go to Tools - Photoshop - and click on Image Processor
Step 2) This will open Photoshop and your Image Processor Tools. First, you will need to designate a new folder to place your editied jpegs.
Step 3) Check “Save as JPEG” and give it a quality of 12. You also will want to resize your images to 1920 x 1080.
Step 4) Then click RUN. This will take a while to batch process as well!
Step 6) QuickTime Image Sequence
The final step is upon us! Open up your QuickTime 7 and select File > Open Image Sequence
Then select your first image and click open. Then select the 29.97 FPS. This will open up your Timelapse. You will want to export your timelapse to MPEG-4. This allows you to upload it to the internet or open it up in Adobe Premier Pro or Adobe Premiere Elements to add titles and transitions and music!

If you have any questions on this process or anything related, comment below! I love hearing feedback and questions!


0 comments:
Post a Comment